


- Ningbo Dongning Tools Co.,Ltd
- Professional Chinese Tools manufacturer on automotive speciality tools,bearing puller&heavy truck tools
- Address
- No.6 Falan Rd,Hengjie Town,Ningbo City,Zhejiang,China
- Phone
- +86-574-87216625
- info@nbdntools.com

Nissan Xterra's are built to be rugged, and their design calls for a slightly different process for replacing the front brake rotors. It involves a few extra steps compared to a typical brake rotor change. The rotor is directly bolted to the hub instead of being sandwiched on the lug studs between the hub and wheel. This process includes removing the hub, rotor, and wheel bearings. So it’s important to keep all the parts in order, especially the wheel bearings, for easy reinstallation. It’s also a good time to repack your bearings with grease since you need to remove them anyway.
STEPS:
No.1 Lift the front end of the truck. Set the parking brake and jack the front of the truck up by the cross member that crosses below the oil pan. Place jack stands under the frame on each side behind the control arms, and lower the truck slowly. Make sure that it is supported securely by the jack stands.
No.2 Remove the front tires. Remove the lug nuts on the front tires and remove the tires. If the wheel is stuck to the hub, give the top of the tire a swift kick with your heel to free it.
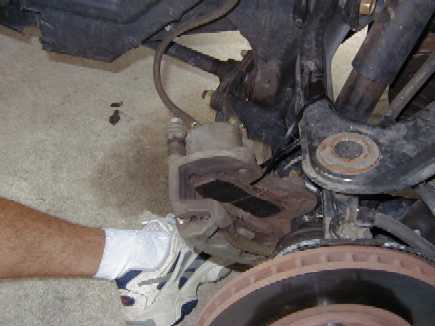
No.3 Remove the caliper. Remove the caliper-mounting bracket with a 22mm socket, and place the caliper assembly away from the work area, being sure not to stress the brake line. If you have zip ties, you can zip tie it to the upper control arm to keep it safely out of the way.
No.4 Remove the hub casing. Using a 6mm allen-key, to remove the bolts holding the cap on. If you are having trouble preventing the rotor from turning while loosening the bolts, interweave a pry bar or other bar through the lug studs, creating a lever to hold it in place. When removing the hub casing, the O-ring, which seals it can stick to the hub, if it does make sure to clean it and keep with the casing.
No.5 Remove the Snap Ring. Using spreading snap ring pliers spread the ring enough to work out of its groove. Use a flat head screwdriver as well as the pliers to gently work the ring off the spindle. Be careful not to over stretch, bend, or break the ring if you intend on reusing it. They aren’t too expensive if you need to replace them.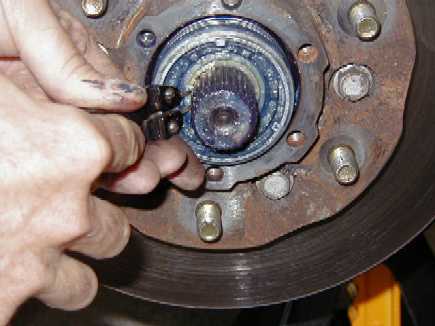
No.6 Remove the cam assembly and lock washer. After the snap ring has been removed the cam assembly should slide off exposing the lock washer. Remove the two screws holding the lock washer to the lock nut. If the grease is causing it to stick to the lock washer, wiggle it free using a screwdriver or punch.
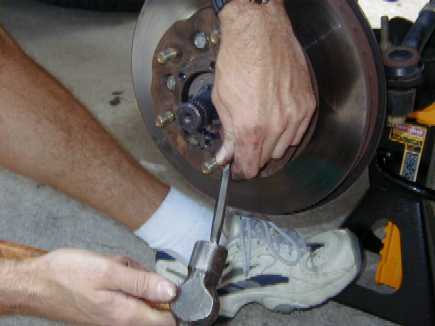
No.7 Remove the lock nut. Tap the lock nut counterclockwise with a hammer and punch. Place the punch in a non-threaded hole in the lock nut, and tap the punch with a hammer to rotate it counterclockwise. Once loosened, hold the rotor in place and remove the lock nut.
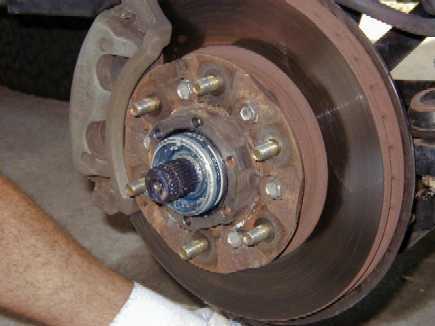
No.8 Remove the outer bearing and brake rotor. With the locknut removed pull gently on the rotor, which will cause it to release the bearing. Try not to drop the bearing if you don’t plan on replacing it, and place it on a clean surface, remembering the direction the bearing fit. Clean the spindle with a rag.If you plan on repacking or replacing your bearings, this is a good time to do it. The inner bearing requires a few more steps and a seal replacement if you plan on servicing it. Properly describing the process of removing the inner bearing as well as packing the bearings with grease would require it’s own set of instructions, which can be found at Florida Xtreme Xterra
No.9 Remove the rotor from the hub assembly. Remove the six bolts securing the rotor to the hub assembly. Using a 3/8” socket extension tap the rotor loose from behind the assembly.
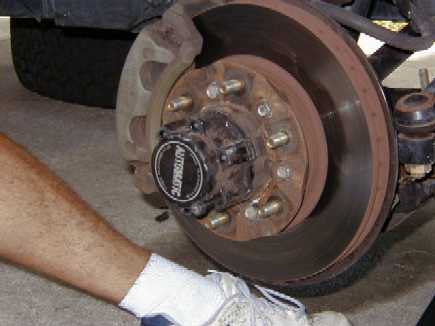
No.10 Install the New rotor. Clean the new rotor with brake parts cleaner and bolt it to the hub assembly. Apply a coat of grease to the spindle and slide the rotor and hub assembly in place over the spindle.
No.11 Install the outer bearing and lock washer. Place the outer bearing back in its place, and press it in making sure it is seated and hold the bearing and rotor in place. Thread on the lock nut until it is hand tight. Lightly tap the lock nut clockwise, with a hammer and punch, using a non-threaded hole in the nut. Tap gently, being sure not to over tighten the nut, but also making sure it is secure. Spin the rotor a few times in both directions by hand, then loosen the locknut slightly and tighten again, following the instructions in step 7 for loosening and previously mentioned in this step for tightening. This will ensure that the bearings and lock nut are seated correctly.
No.12 Finish reinstalling the hub and casing. Install the lock washer over the lock nut and tighten its two screws. Slide the cam assembly over the spindle and twist making sure it seats completely, exposing the inner groove for the snap ring. Using the snap ring pliers and flat head screwdriver, slide the snap ring in place making sure it seats completely in its groove.
No.13 Remove the caliper from its mounting bracket. Remove the caliper sliding pin bolts and separate the caliper from its mounting bracket. Remove the slide pins and boots and wipe them clean. Lube the slide pins with grease specially formulated for brake slide pins, and reinstall pins and boots.
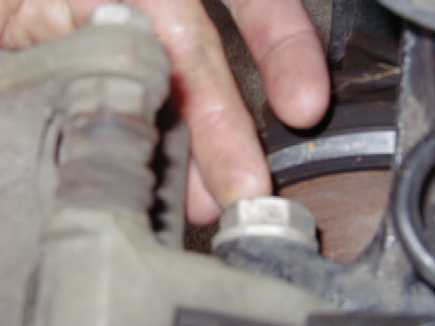
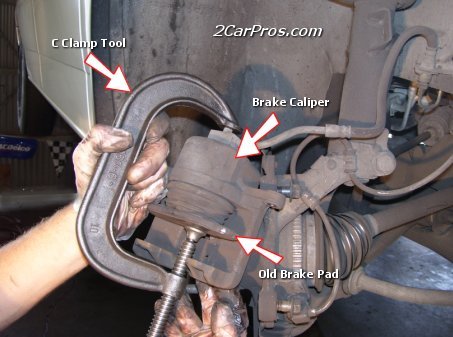
No.14 Remove the old pads and compress the Brake Piston. Tap the old pads out of the caliper with a hammer and 3/8” socket extension. Compress the piston into the caliper using a C-clamp or other clamp available. Compress the piston all the way to make room for the new, thicker, pads to fit over the rotor.
No.15 Install the new pads and caliper. Match the new pads with the old pads to make sure you are installing the pads in the right place. Bolt the caliper-mounting bracket back in place. Press the pads in place in the caliper. Slip the caliper in the mounting bracket over the rotor, and bolt it to the bracket with the sliding pin bolts.
No.16 Reinstall the tires and lower the vehicle. Place the wheel and tire back in place over the lug studs, and hand tighten the lug nuts. Tighten the lug nuts and lower the truck.