12pc bearing separator and puller set instruction
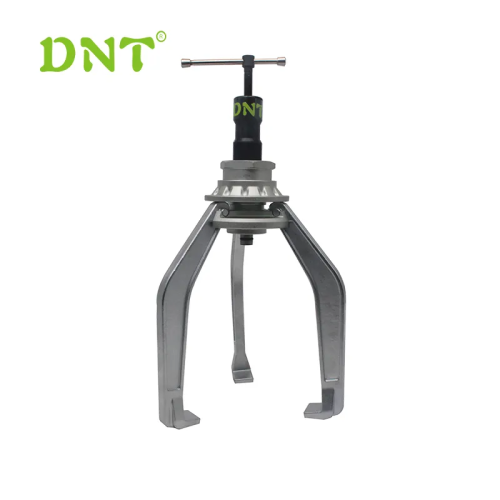
5 TON BEARING PULLER TOOL SET

Safety Warning and Precautions
• Keep work area clean. Cluttered areas invite injuries.
• Observe work area conditions. Do not use machines or power tools in damp or wet locations. Don’t expose to rain. Keep work area well lighted.
• Keep children away. Children must never be allowed in the work area. Do not let them handle machines, tools, or extension cords.
• Store idle equipment. When not in use, tools must be stored in a dry location to inhibit rust. Always lock up tools and keep out of reach of children.
• Use the right tool for the job. Do not attempt to force a small tool or attachment to do the work of a larger industrial tool. There are certain applications for which this tool was designed. It will do the job better and more safety at the rate for which it was intended. Do not modify this tool and do not use this tool for a purpose for which it was not intended.
• Dress properly. Do not wear loose clothing or jewelry as they can be caught in moving parts. Protective, electrically non-conductive clothes and non-skid footwear are recommended when working. Wear restrictive hair covering to contain long hair.
• Do not overreach. Keep proper footing and balance at all times. Do not reach over or across running machines.
• Maintain tools with care. Keep tools sharp and clean for better and safer performance. Follow instructions for lubricating and changing accessories.
• Stay alert. Watch what you are doing, use common sense. Do not operate any tool when you are tired.
• Check for damaged parts. Before using any tool, any part that appears damaged should be carefully checked to determine that it will operate properly and perform its intended function. Check for alignment and binding of moving parts; any broken parts or mounting fixtures; and any other condition that may affect proper operation. Any part that is damaged should be properly repaired or replaced by a qualified technician.
• Replacement parts and accessories. When servicing, use only identical replacement parts. Use of any other parts will void the warranty. Only use accessories intended for use with this tool.
• Do not operate tool if under the influence of alcohol or drugs. Read warning labels if taking prescription medicine to determine if your judgment or reflexes are impaired while taking drugs. If there is any doubt, do not operate the tool
Product Safety Precautions
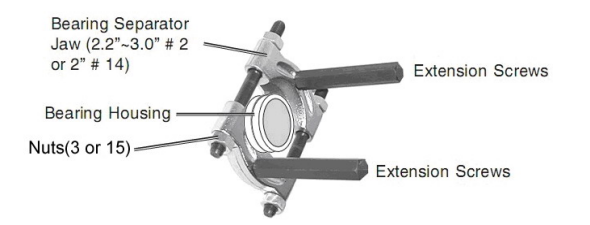
• Be certain that the separator jaws are evenly set between bearing halves before attempting to separate.
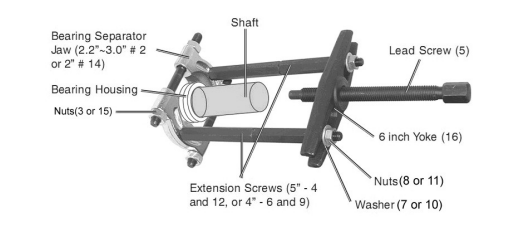
• Lead Screw (5) should be centered on the shaft where the bearings are being pulled to avoid damaging shaft or bearing housing.
• Avoid pinching or scraping the bearing shaft by securely (and squarely) placing the Jaws around the bearing housing.
• Use care when removing the Lead Screw (5) from the case to avoid damaging the threads. Pry up from the ends of the Lead Screw (5).
Operation
Pulling Bearings off Shaft
• Select the proper size Bearing Separator Jaw (2.2 "~3.0 "#2 or 2" #14)for the bearing size being removed from the shaft.
• Loosen the Separator Jaw Nuts (3 or 15) sufficiently to allow the jaws to catch behind the bearing housing.
• Using a wrench (not supplied) begin to (evenly) tighten the Nuts (3 or 15) until the jaws are securely set behind the bearing housing.
• Screw in both Extension Screws (5"- 4 and 12, or 4"- 6 and 9) of the same length into the bearing separator jaws (2.2"~3.0" #2 or 2" #14)as in Picture 1 below.
Note: Do not use Extension Screws of different lengths.
• Place the 6" Yoke (16) over the Extension Screws (5"- 4 and 12, or 4"- 6 and 9) and tightly secure with Washers (7 or 10) and Nuts (8 or 11).
• Screw in Lead Screw (5) into the Yoke (16) until it touches the center of the shaft where the bearings are mounted.
• Using a wrench, turn the Lead Screw (5) clockwise until the bearing housing begins to move off the shaft. Continue turning the Lead Screw (5) until the bearing housing is off the shaft.
• Remove the Lead Screw (5) by turning it counterclockwise.
• Remove bearing housing.
Separating Bearing Housings
• Select the proper size Bearing Separator Jaw (2.2"~3.0" #2 or 2" #14) for the bearing size being separated. Refer to Picture 2 below.
• Loosen the Separator Jaw Nuts (3 or 15) sufficiently to allow the Jaws to catch between each bearing housing.
• Using a wrench (not supplied) begin to tighten Nuts (3 or 15) until the Jaws are securely set between the bearing housings.
• Screw in the selected Extension Screws as shown below. The Extension Screws allows the user to grip them and add stability while tightening Nuts (3 or 15).
• Continue tightening Nuts (3 or 15) until the bearing housing are separated. When the bearing housings are separated, remove the Bearing Separator Jaw (2.2"~3.0" #2 or 2" #14).
Caution: Over tightening Separator Jaw Nuts may damage bearings.