


- Ningbo Dongning Tools Co.,Ltd
- Professional Chinese Tools manufacturer on automotive speciality tools,bearing puller&heavy truck tools
- Address
- No.6 Falan Rd,Hengjie Town,Ningbo City,Zhejiang,China
- Phone
- +86-574-87216625
- info@nbdntools.com

There are plenty of aftermarket head units—the boxes that radio hardware lives in—that have advanced features and can connect to smartphones, and many of these units are just a few hundred dollars. In many modern vehicles, the audio system is deeply integrated into a larger infotainment operating system. Even so, cars take three to four years to develop, so their technology often lags behind the best phone features on the market. Since replacing a radio head unit is cheaper than replacing a car, this upgrade is a great option for keeping up with the times without spending a fortune.
WHAT AND HOW TO BUY
If you want to upgrade your car stereo, better hope your vehicle subscribes to the DIN configuration. A single—DIN radio fits into a 2 x 7—inch slot, while a double-DIN size is 4 x 7 inches. While this standard made sense for automakers in the past, they've been moving away from DIN-sized units and toward built-in nonstandard stereos integrated with other systems of the car (alarm, navigation, etc.).
All audio units operate similarly: 12-volt power comes in; circuitry and processors generate signals that drive screens and speakers. Mating a universal aftermarket radio to a model-specific speaker and power wiring can run the gamut from plug-and-play (easy) to running new wiring (hard). Fortunately, adapter kits can be ordered for just about every car now. Also check if an output converter is needed (a box that makes the new radio work with the factory speakers), as well as an antenna adapter or faceplate filler panels to make up for gaps that may be created.
The one downside to an aftermarket radio is that many are, uh, aesthetically challenged. For around $200 a good-quality unit should come with a full-size USB port for charging your devices and Bluetooth connectivity for calls and media streaming. Of course, your budget and needs will dictate your pick.
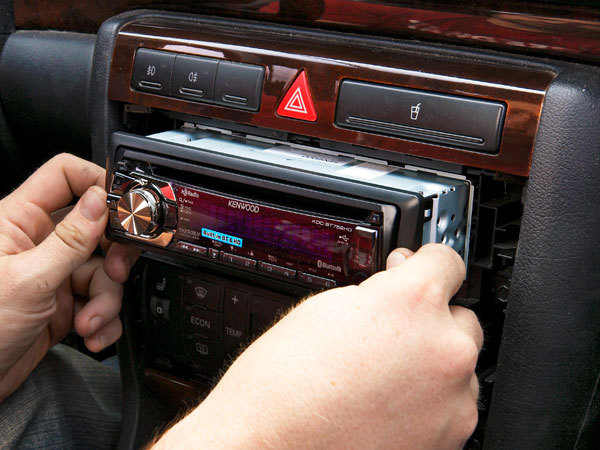
EXTRACT AND INSTALL
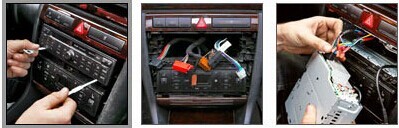
Getting the old radio box out sometimes means pulling trim pieces off first, so use trim-removal tools and be gentle. Spring latches hold the radio in place, and small slots or holes in the face of the radio provide access for a removal tool that may be needed for your specific car. Often a flattened piece of solid wire will do the trick, though. With the latches released, wriggle the radio out. You'll need to detach the antenna coaxial cable and some quick-disconnect wiring before you can set the old box aside.
Your car might be fitted with a standard metal mounting frame. If not, as was the case with our Audi A4, slide the kit frame into place and bend out a few of the metal tabs to hold the frame in place. If you have an appropriate adapter harness, plug the factory connectors into the adapter and plug the adapter into the radio. All DIN connectors look the same, but they may have different pinouts, so if you're replacing a previously installed aftermarket radio, the wiring setup may not be an exact match. Before finishing the install, check the radio, make sure the speakers are working properly, and link and test any phones or players you may want to use. If a fuse blows, retrace your steps, since a wire is likely hooked up incorrectly. Once everything works, push the new radio body into the DIN slot until you hear the latches click on both sides, locking it in place. Install faceplate adapters and replace any trim you may have pulled off.