


- Ningbo Dongning Tools Co.,Ltd
- Professional Chinese Tools manufacturer on automotive speciality tools,bearing puller&heavy truck tools
- Address
- No.6 Falan Rd,Hengjie Town,Ningbo City,Zhejiang,China
- Phone
- +86-574-87216625
- info@nbdntools.com

At this point there were 4 more things to do before the engine could be installed:
But I couldn't install the rear seal until I got the engine off the stand, so that meant I had to rent an engine hoist for the last few steps, and then shove the engine back in the car.
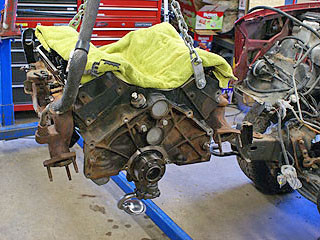
picked up the engine and remove the engine stand.
placed an old clean bath towel over the top of the engine to keep dust and debris out.
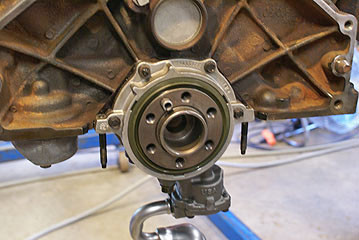
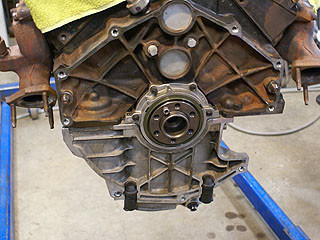
installed the rear oil seal at this time, though it could've been done when the crankshaft was installed.
This was just a pain in the ass. It took me 7 or 8 attempts.
There is a gasket behind the seal block. I applied High Tack gasket adhesive to the engine block, then installed the gasket and applied High Tack to the other surface of the gasket. This way, I avoided having gasket adhesive on the back of the seal block while messing with it for all that time.
Installing The Oil Pan:
WARNING - DO NOT SKIP THIS STEP
When I installed the oil pan, I was in a hurry. I had just rented an engine hoist and was eager to put the engine back in the car.
I completely missed an important step: Applying some RTV silicone gasket material where the timing chain cover meets the oil pan.
Consequently, I had a major oil leak when I finally got the engine running, and it took a lot of work to remove all the parts to be able to squeeze two dabs of silicone into the right spots.
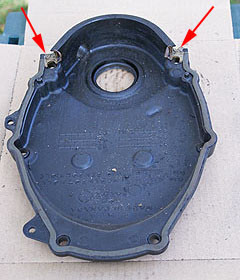
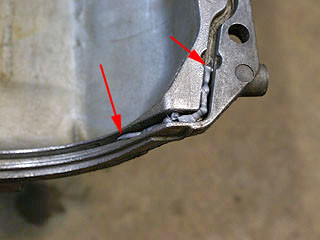
This is the back side of the old timing chain cover. The red arrows point to the spots that need RTV silicone gasket compound.
Note that the bottom end of the cover is at the top of the picture. The oil pan gasket seals against the big hump at the top of the picture.
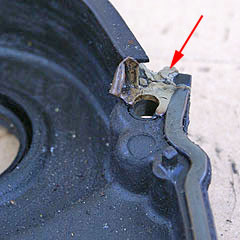
A closer view of the silicone gasket material (arrow) on the original timing chain cover.
The replacement cover has a bead of rubber gasket already applied to the perimeter. The oil pan gasket seals agains the big hump at the bottom of the cover.
But there are two little spaces with no gasket... and when installing the oil pan you need to apply a generous dab of silicone gasket material here. If you apply silicone here when the timing chain cover is installed, the material that oozes out may interfere with the oil pan gasket.
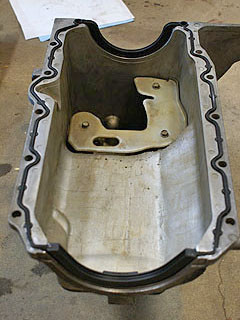
applied a thin bead of silicone RTV extending about one inch in each direction from each corner of the oil pan.The arrows show the ends of the bead of silicone.
laid the new oil pan gasket into the groove in the oil pan and pressed it down gently at the corners.
installed the oil pan and tightened the bolts a little bit.I couldn't fully torque the bolts until the engine was connected to the transmission. The RTV silicone gasket material will begin to set up in about an hour, so this is a race against time.
Flex Plate:
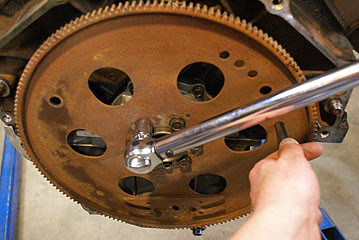
installed the flex plate and tightened the bolts to 75 foot-pounds, using a cross-pattern.
used a punch to hold the flex plate from turning.Also, I applied some blue thread-locker (medium strength) to the bolt threads before installing them.
Installing The Oil Filter Adapter:
Initially, I made the mistake of installing the oil filter adapter while the engine was upside-down on the engine stand, but before the oil pan was installed. I never bothered to check if the oil pan would fit on the engine with the adapter already installed.
IT WON'T !
When I was installing the oil pan, I had to remove the oil filter adapter, which tore the fiber gasket. (It just separated into two layers... no big deal.)
And I made another mistake here: I should have re-installed the filter adapter right after installing the oil pan. Being in a hurry, I said "nah... I'll do it later". After all, I removed the adapter while the engine was in the car. I (vaguely) remembered that from 20 months earlier.
During the engine installation process, I had the engine supported by the hoist for a good half-day. One item on my "To Do" list was: Install the oil filter adapter. But I kept procrastinating, because there were many more important tasks to complete. As the deadline neared for my single-day hoist rental, I hurried up and dropped the engine down and connected the motor mounts. "I'm sure I can install the filter adapter later" I said to myself, figuring that "It's just a little piece of metal".
That wasn't so smart.
By the time I got around to installing this stupid little piece of aluminum, I couldn't get this part close to the engine because the exhaust pipe, front driveshaft and differential were in the way. So I had to remove the exhaust Y-pipe that I had recently installed.
And the oil lines that run from the filter adapter to the front of the car? Those lines run along the driver's side of the engine, just below the oil pan. Even in this over-stuffed car, there is a fair amount of space for the oil lines... even when they pass between the engine mount and the frame.
BUT... they use a 3-inch long block of metal at the ends of the oil lines as a simpler way of connecting to the adapter. And that big 'ol block of metal won't fit through that space between the engine mount and the vehicle frame.
So I ended up removing the driver's side engine mount bolt, and raising the engine with a bottle jack placed under the oil pan. I only had to lift the engine about 1/2 inch to be able to slide that block of metal through to the promised land.
The moral of the story is: BEFORE you install the engine in a Jimmy or Blazer, make sure the oil filter adapter is installed, and the oil lines are connected to the adapter. You'll save yourself a lot of headaches.
Installing The Oil Filter Adapter:
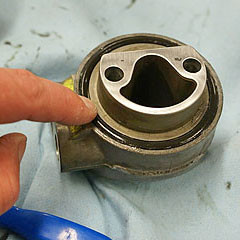
This aluminum casting is the oil filter adapter that diverts the engine oil to the remote oil filter just below the radiator.
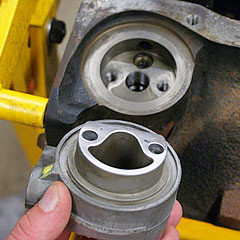
After cleaned off the old gasket, I applied some Permatex High Tack gasket adhesive to the recess in the engine block.
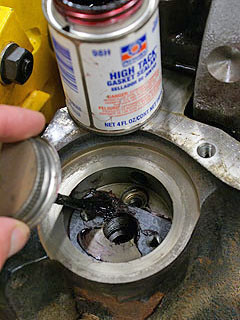
To keep the rubber O-ring from falling out, applied a couple of dabs of petroleum jelly to the groove in the underside of the adapter.and smeared some petroleum jelly on the outer surface of the O-ring to lubricate it.
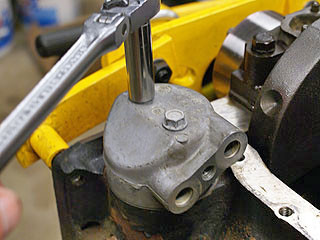
Then I installed the adapter with the two original bolts and tightened them firmly.
Reminder:
Connect the oil lines to the filter adapter before installing the engine. Also, the oil lines should be secured to the oil pan with a small clamp that's held by an oil pan bolt.