- Ningbo Dongning Tools Co.,Ltd
- Professional Chinese Tools manufacturer on automotive speciality tools,bearing puller&heavy truck tools
- Address
- No.6 Falan Rd,Hengjie Town,Ningbo City,Zhejiang,China
- Phone
- +86-574-87216625
- info@nbdntools.com

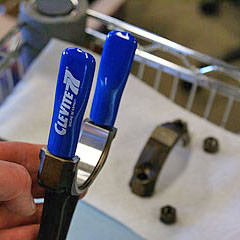
After the old rings are removed, the ring grooves need to be cleaned. Installing piston rings requires a special tool, which doesn't cost much.
before removed the pistons, I used a set of number punches to stamp the cylinder number on each rod cap, just to ensure I would have no problem keeping track of which piston belonged in which cylinder.
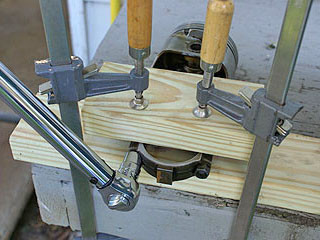
Removing Tight Rod Nuts:
the connecting rod nuts where tightened to the proper torque.But there was no way I could remove those nuts without some type of fixture to hold the rods. So I simply placed the end of the connecting rod on a clean 2x4 block of wood on a workbench, covered the rod with another block of 2x4, and clamped everything to the bench with two 12-inch bar clamps. Then I was able to remove the rod nuts easily.
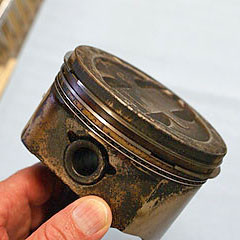
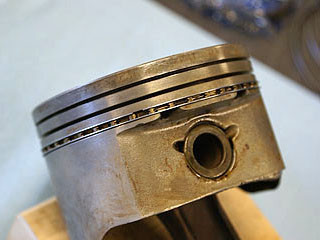
Notice how dirty the pistons were after 163,000 miles.
The brownish-black stuff is oil residue that has become baked on. Behind the piston rings there is even more residue, and it doesn't come off easily
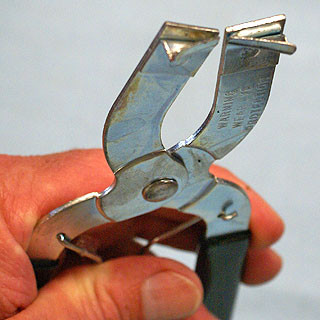
Special Tool:
This is a piston ring installer tool, which is also used to remove piston rings.
Removing The Compression Rings:
The top two rings are called compression rings. These create a tight seal between the piston and the cylinder wall.
pushed the piston ring so the ends were sticking out, then placed the tips of the piston ring pliers over the ends of the ring, and spread the ring apart so it would slip over the piston.
WARNING: It's tempting to "spiral" the piston rings into the grooves, but that can bend the rings and make them bind, causing serious wear. It's certainly okay to remove the old rings without this special tool, but the tool MUST be used to install new rings.
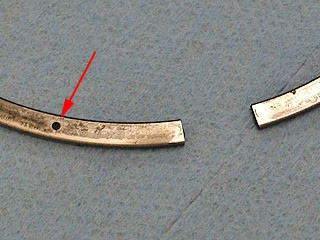
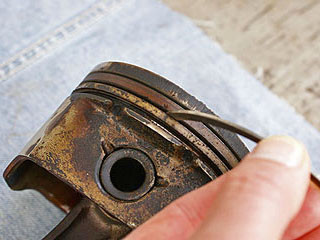
Note the dot near the end of the piston ring. This dot (or any type of marking) indicates the top of the ring.This is important when installing new rings, the rings are NOT reversible.
Oil Control Rings:
The oil control rings consist of two thin rings separated by a waffle-shaped spacer.
The ends of the rings are not supposed to be adjacent to each other. It can be difficult to find the ends of these rings (red arrows).
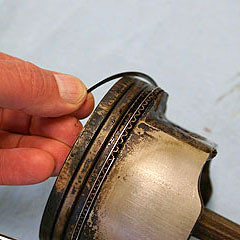
used a curved hook tool to pry out the end of the oil control ring, and removed the ring by "spiralling" it off.
This is acceptable for oil control rings. The piston ring pliers don't work on oil control rings.
Then removed the oil control ring spacer.
Cleaning The Piston Ring Grooves:
After trying various methods of cleaning the baked-on oil from the back of the ring grooves, I cut an old ring in half and use the factory-cut end as a scraper.
When scraping the back of the ring grooves I was very careful to keep the scratching to a minimum. The scraping did create some small flakes of metal, which I blew out with compressed air.
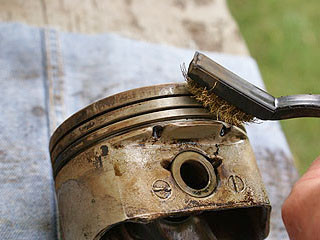
Once the ring grooves were clean, dipped the end of the piston in Xylene and used a brass brush to clean the oil residue from the aluminum piston. This involved A LOT of scrubbing.
Note that carburator cleaner is often made from xylene, with other solvents added sometimes. Brake parts cleaner would also work, but a quart can of xylene is cheaper and leaves no residue (that I know of).
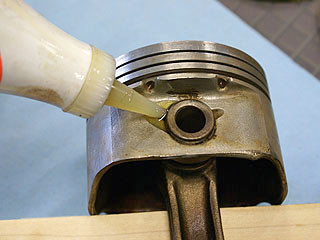
Since cleaning in xylene also removed the oil between the wrist pin and the piston, I applied some regular motor oil to the small notches on the outside of the piston.
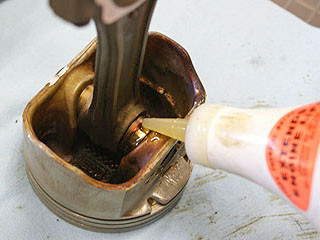
applied a few drops of motor oil to the wrist pin from the underside.
Then swivelled the piston back-and-forth to spead the oil around.
Note that the wrist pin is pressed into the connecting rod, so the swiveling occurs between the piston and the wrist pin.
Stuck Piston Ring:
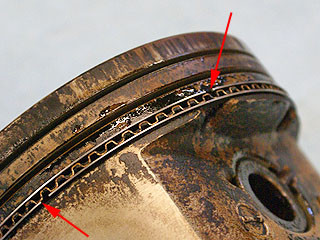
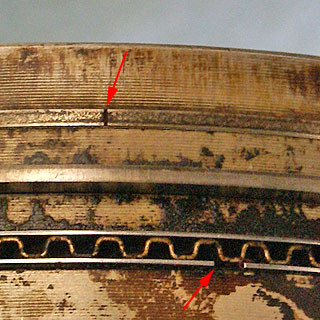
When removed piston number 6 from the engine, the top ring (upper arrow) was stuck. Note how small the gap is between the ends of the ring. This is typical of the end gap when the pistons are inside the cylinders.
The lower piston ring (which runs across the middle of the pcture), was not stuck and expanded properly when the piston was removed.
The arrow near the bottom points to the gap in one of the oil control rings
It turned out that this stuck ring was rusted on top, probably because some water got into the engine while it was sitting in my garage for a year and a half. I think water would sometimes drip from the gaps between the panels of the overhead door, and those drops landed in the intake manifold that leads to cylinder 6. I'm guessing that this minor issue is completely separate from the rod knock on number 6.
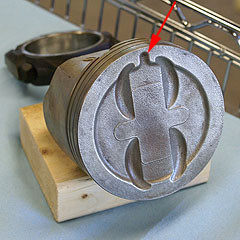
Piston Orientation:
Note the notch molded into the top of the piston (red arrow). When the piston is installed, this notch points towards the front of the engine.
Some automakers mold an arrow into the piston, which points to the front of the engine.
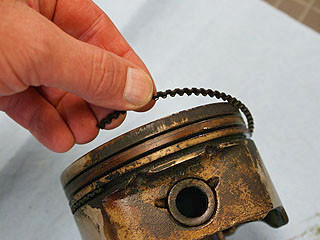
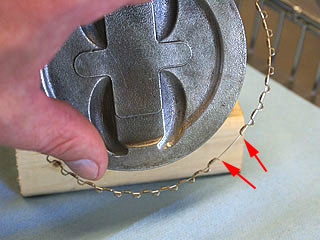
spread the oil control spacer apart and slipped it over the piston and inserted it into the lowest groove.The arrows point to the ends of the waffle material, but there is a curved wire threaded through the ends, which holds the ends of the spacer in the proper shape.
Then inserted the lower oil control ring at the bottom of the spacer.Oil control rings are flexible and you can "wind" them or "spiral" them into place.and made sure the end gap was about 45 degrees away from the wrist pin.
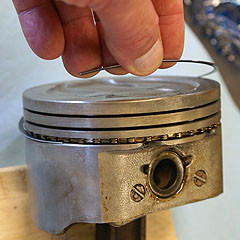
installed the upper oil control ring.The gap was 180 degrees from the lower oil control ring.
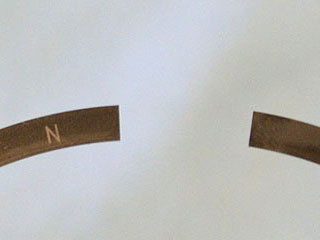
Note the letter "N" near the end of the compression rings.Any mark near the end of a compression ring is supposed to indicate that side goes towards the top of the piston.
used the piston ring pliers to install the second (lower) compression ring.Then installed the upper ring, which is narrower.

Positioning The Piston Ring Ends:
Each of these pistons has 5 rings, and the end gaps need to be staggered to minimize the amount of combustion chamber gases that escape.
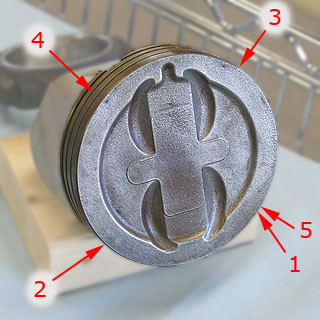
PISTON RING END LOCATIONS:
This picture shows how I placed the ends of the piston rings:
1. Oil Control Spacer
2. Lower Oil Control Ring
3. Upper Oil Control Ring
4. Lower Compression Ring
5. Upper Compression Ring
It's fairly easy to rotate the rings a bit after they have been installed.
removed the cap from the piston and pressed a bearing shell into place, making sure to align the tab on the bearing with the notch in the connecting rod.then installed a bearing shell in the rod cap.
Before installing these bearings, cleaned everything with brake parts cleaner to remove as much oil as possible.
The bearings need to be clean when the piston is installed.
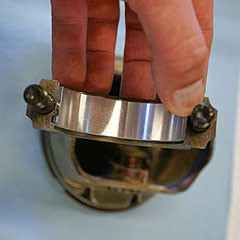
placed these plastic boots over the connecting rod studs to protect the cylinder wall and crankshaft journals during assembly. Even a small nick in those surfaces can cause early engine failure.